

Personlized Products How To Deactivate A Car Tracker - fuel level gauge ultrasonic fuel level sensor – Dragon Bridge Detail:
User Manual of Fuel Sensor Device
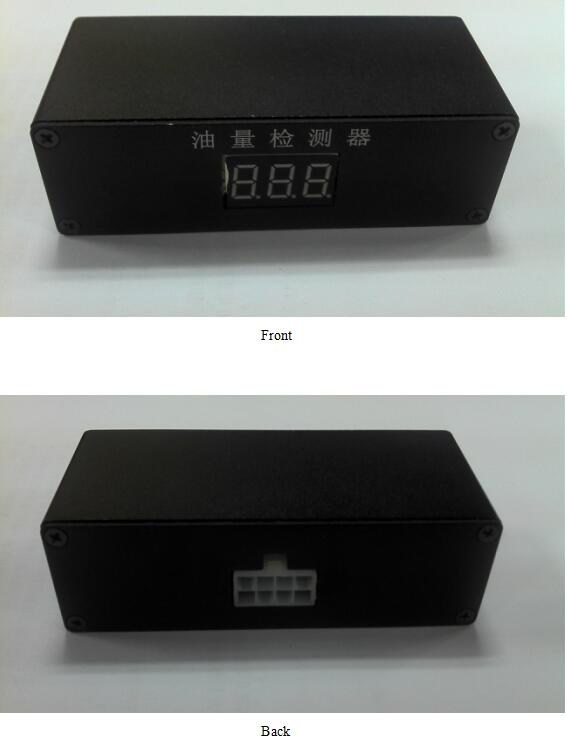
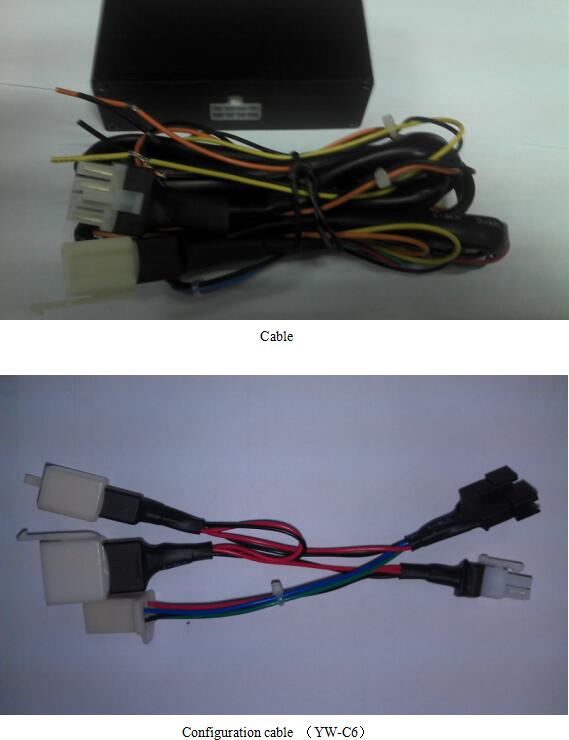
Product Picture
Fuel consumption detector (YW1159)
Installation
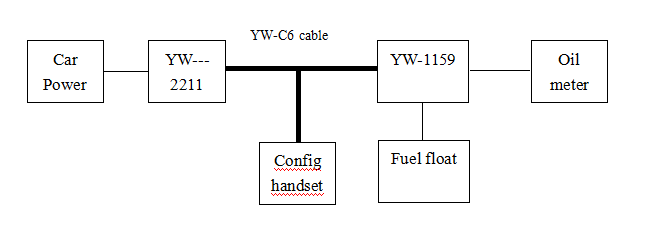
1、Wiring Diagram

2、How to connect
|
Configuration cable |
|
| 8PIN connector | Connect to YW1159 |
| 4PIN connector | Connect to YW2211 |
| Yellow wire | Connect to fuel gauge float |
| Orange wire | Connect to the positive of oil meter |
| Black-white wire | Connect to the negative of car power |
3、Please check before instillation
1) Check whether the car original oil detector system working normal or not; when ACC is ON, car original oil detector system working well and the oil meter fix on the current oil level. Please note down the current oil level value.
2) Check the fuel gauge float is variable resistance fuel level sensor; Disconnect the car power, using the resistance profile of multi-meter to check whether the fuel float has the normal resistance( normally, it 5~500 Ω),few car use Voltage type oil float which are not suitable for this product.
4、Steps
1) Take apart of dash board carefully and find out the oil meter signal line.
2) Oil meter signal line voltage;Using the voltage profile of multi-meter measuring signal line for power supply voltage(1~5V)
- Oil meter signal line is connect to the fuel float signal line; Disconnect the power, connect the fuel float signal line with one side of the multi-meter conduction and oil meter signal line connect to another side of multi-meter, if connected, than that must be the oil tank signal line.
- Cut off Oil meter signal line, oil meter needle will come up to the top or bottom suddenly. If not, please find again for the right oil meter signal line.
Configuration
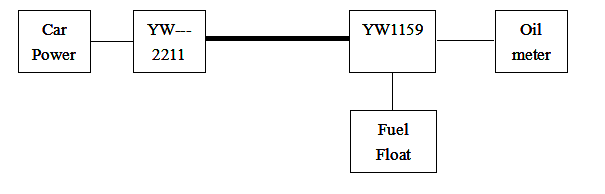
After configuration, you need to disconnect the YW-C6 cable and connect them again as normal as following.
2、How to config– Resistance simulation method
Advantage:Easy to install
Disadvantage:The precision will be affected by the oil meter precision itself or evaluation error.
Please note down the needle value (eg.50%) before installation compared with the real value after configuration.
Edit *#85*0# by handset to clear the previous sample setting.
Edit *#87*r# by handset to set the fictitious resistance r, after oil meter needle become stably, note down the value p (%) and the current fictitious resistance r, collect at least 3 groups of data( the more you collect, the more precision you will get, but not more than 30 groups).when setting the fictitious resistance ,it should be the multiple of the number five, for eg. 0Ω, 5Ω,10Ω,etc.
Edit *#85*n*p*r# to set the No. n(n≤30)fictitious resistance r and oil meter value p, and then input the value(p) which you got above in sequence, from large value to small.
Edit *#85# to finish get sample value.
When the value shows on YW1159 corresponds closely to the value on the oil meter before installation, it means config successfully.
For Example
Edit*#85*0# to clear all the previous sample settings.
Edit *#87*5# to set the resistance as 5Ω, estimate the value on the oil meter as 100—record r: 5, P: 100
Edit *#87*10# to set the resistance as 10Ω, estimate the value on the oil meter as 90—record r: 10, P: 90
Edit *#87*15# to set the resistance as 15Ω, estimate the value on the oil meter as 80—record r: 15, P: 80
Edit *#87*20# to set the resistance as 20Ω, estimate the value on the oil meter as 70—record r: 20, P: 70
Edit *#87*30# to set the resistance as 30Ω, estimate the value on the oil meter as 50—record r: 30, P: 50
Edit *#87*40# to set the resistance as 40Ω, estimate the value on the oil meter as 45—record r: 40, P: 45
Edit *#87*50# to set the resistance as 50Ω, estimate the value on the oil meter as 25—record r: 50, P: 25
Edit *#87*60# to set the resistance as 60Ω, estimate the value on the oil meter as 22—record r: 60, P: 22
Edit *#87*70# to set the resistance as 70Ω, estimate the value on the oil meter as 20—record r: 70, P: 20
Edit *#87*80# to set the resistance as 80Ω, estimate the value on the oil meter as 13—record r: 80, P: 13
Edit *#87*85# to set the resistance as 85Ω, estimate the value on the oil meter as 10—record r: 85, P: 10
Edit *#87*90# to set the resistance as 90Ω, estimate the value on the oil meter as 0—record r: 90, P: 0
(Note: The resistance value is inversely proportional to the oil meter value.)
Set the No. n(n≤30)fictitious resistance r and oil meter value p, and then input the value (p) which you got above in sequence, from large value to small.
*#85*1*100*5#,set successfully and feedback as:1,100,5
*#85*2*90*10#,set successfully and feedback as:2,90,10
*#85*3*80*15#,set successfully and feedback as:3,80,15
*#85*4*70*20#,set successfully and feedback as:4,70,20
*#85*5*50*30#,set successfully and feedback as:5,50,30
*#85*6*45*40#,set successfully and feedback as:6,45,40
*#85*7*25*50#,set successfully and feedback as:7,25,50
*#85*8*22*60#,set successfully and feedback as:8,22,60
*#85*9*20*70#,set successfully and feedback as:9,20,70
*#85*10*13*80#,set successfully and feedback as:10,13,80
*#85*11*10*85#,set successfully and feedback as:11,10,85
*#85*12*0*90#,set successfully and feedback as:12,0,90
Product detail pictures:


Related Product Guide:
Enterprise Awarded Military Contract – Rental Operations | Fleet Management System Features
Indulge all of your trust issues with this tiny GPS tracking device | Good Car Camera
Our firm aims to operating faithfully, serving to all of our consumers , and working in new technology and new machine continually for Personlized Products How To Deactivate A Car Tracker - fuel level gauge ultrasonic fuel level sensor – Dragon Bridge, The product will supply to all over the world, such as: United States , Iraq , Washington , Custom orders are acceptable with different quality grade and customer's especial design. We are looking forward to establish the good and successful cooperation in business with long terms from the customers of all over the world.
Superb technology, perfect after-sales service and efficient work efficiency, we think this is our best choice.


